一、理解物理端口&逻辑接口命名
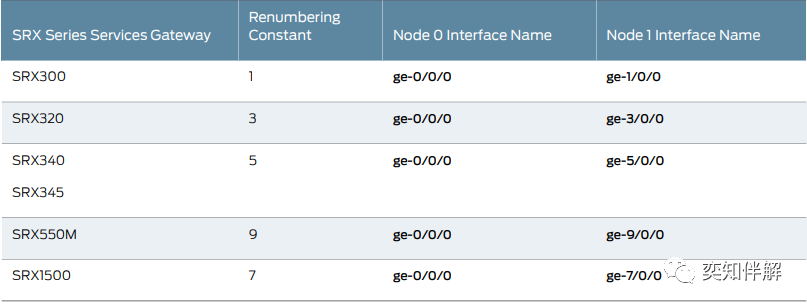
在设备作为集群连接之后,一个设备上的插槽编号会发生变化,因此接口编号也会发生变化。两个节点中每个槽的槽号使用以下公式确定:
cluster slot number = (node ID * maximum slots per node) + local slot number
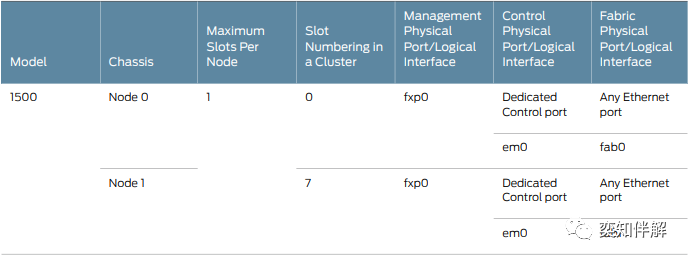
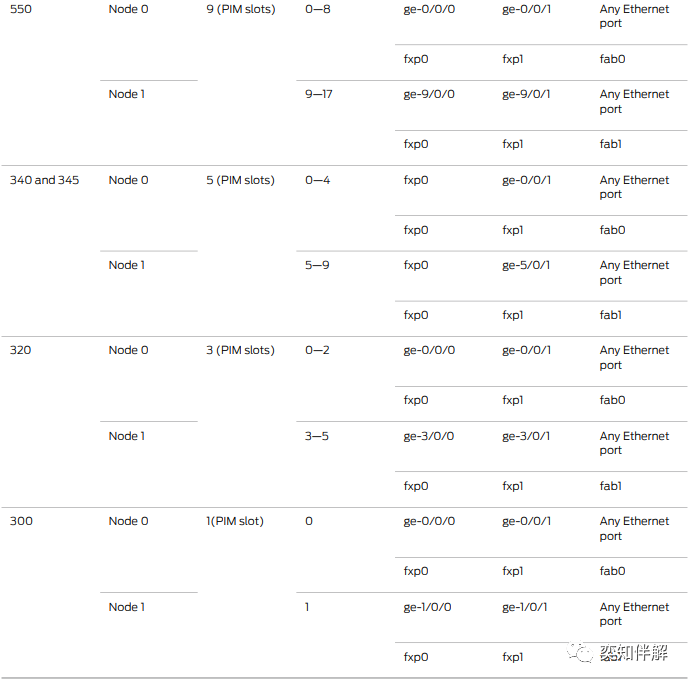
下面用SRX300, SRX320, SRX340, SRX345, SRX550M, and SRX1500的SRX系列设备做一下具体说明:
对于SRX340 and SRX345 设备, the fxp0是专属接口;而对于SRX300 and SRX320设备,应用了chassis clustering 并重启系统,它们的ge-0/0/0接口当做逻辑接口会被重命名为 fxp0 被用作管理使用。
对于 SRX300, SRX320, SRX340, and SRX345设备的ge-0/0/1接口当做逻辑接口会被重命名为 fxp1 被用来作为控制接口,SRX550M控制接口是专用的千兆以太网端口。
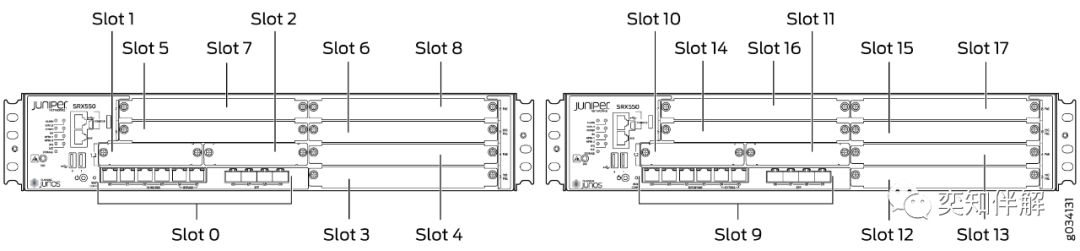
SRX系列部分设备Slot图示


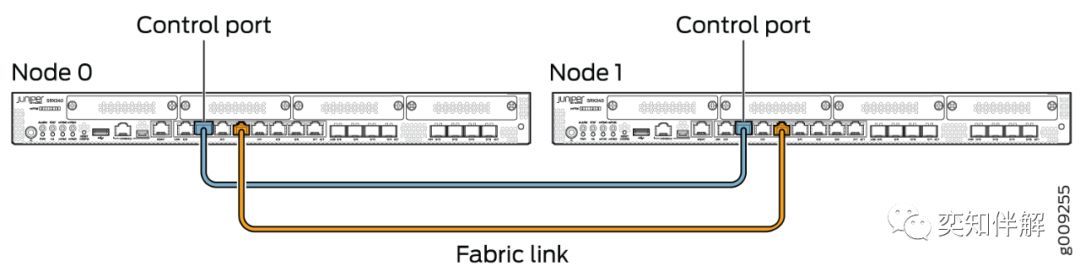
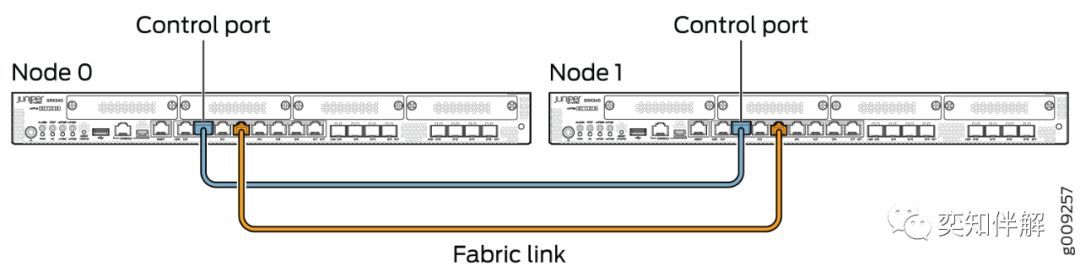
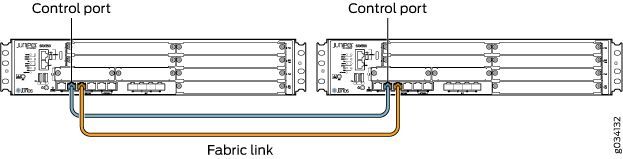
设备HA连接举例:
如果使用以下SRX系列设备,必须使用以下端口连接形成控制链路。
对于SRX300设备,将node0上的ge-0/0/1连接到node1上的ge-1/0/1。
对于SRX320设备,将node0上的ge-0/0/1连接到node1上的ge-3/0/1。
对于SRX340和SRX345设备,将node0上的ge-0/0/1连接到node1上的ge-5/0/1。
对于srx550米设备,将node0上的ge-0/0/1连接到node1上的ge-9/0/1。
如果使用以下SRX系列设备,形成fabric link。
对于SRX300和SRX320设备,除了ge-0/0/0和ge-0/0/1外的任何接口可互联。
对于SRX340和SRX345设备,除了fxp0和ge-0/0/1之外的任何接口可互联。
SRX系列部分设备连线图示


SRX系列设备接口重新编号简图
二、HA配置
配置junos之前,建议删除出厂所有配置(直接delete就好了)。然后配置好junos root密码,并且commit。
set system root-authentication plain-text-password1、HA的配置&配置说明
SRX系列防火墙HA采用的是cluster,两台防火墙虚拟成一台。而一般采用的是主备模式,备机需要单独的管理。
要求两台设备的型号、版本、板卡、License等完全一致。
可使用以下命令查看:
root> show version
root> show chassis hardware detail
root> show system license
以下使用SRX550的HA配置作为示例说明。
总体配置:
set groups node0 system host-name srx550-1
set groups node0 interfaces fxp0 unit 0 family inet address <ip address/mask>  -Device srx550-1's management IP address on fxp0 interface
set groups node1 system host-name srx550-2
set groups node1 interfaces fxp0 unit 0 family inet address <ip address/mask>  -Device srx550-2's management IP address on fxp0 interface
set groups node0 system backup-router <backup next-hop from fxp0> destination <management network/mask>
set groups node1 system backup-router <backup next-hop from fxp0> destination <management network/mask>
set apply-groups "${node}"
set interfaces fab0 fabric-options member-interfaces ge-0/0/2
set interfaces fab1 fabric-options member-interfaces ge-9/0/2
set chassis cluster redundancy-group 0 node 0 priority 100
set chassis cluster redundancy-group 0 node 1 priority 1
set chassis cluster redundancy-group 1 node 0 priority 100
set chassis cluster redundancy-group 1 node 1 priority 1
set chassis cluster redundancy-group 1 interface-monitor ge-0/0/3 weight 255
set chassis cluster redundancy-group 1 interface-monitor ge-0/0/4 weight 255
set chassis cluster redundancy-group 1 interface-monitor ge-9/0/3 weight 255
set chassis cluster redundancy-group 1 interface-monitor ge-9/0/4 weight 255
set chassis cluster reth-count 2
-for first interface in the group (on Device A)
set interfaces ge-0/0/4 gigether-options redundant-parent reth1
-for second interface in the group (on Device B)
set interfaces ge-9/0/4 gigether-options redundant-parent reth1
set interfaces reth1 redundant-ether-options redundancy-group 1
set interfaces reth1 unit 0 family inet address <ip address/mask>
-for first interface in the group (on Device A)
set interfaces ge-0/0/3 gigether-options redundant-parent reth0
-for second interface in the group (on Device B)
set interfaces ge-9/0/3 gigether-options redundant-parent reth0
set interfaces reth0 redundant-ether-options redundancy-group 1

set interfaces reth0 unit 0 family inet address <ip address/mask>
set security zones security-zone Untrust interfaces reth1.0
set security zones security-zone Trust interfaces reth0.0
2.1 在node0上为每个设备设置主机名和管理IP地址。
user@host# set groups node0 system host-name srx550-1
user@host# set groups node0 interfaces fxp0 unit 0 family inet address <ip address/mask>
user@host# set groups node1 system host-name srx550-2
user@host# set groups node1 interfaces fxp0 unit 0 family inet address <ip address/mask>
2.2 指定Fabric Link Port 主要用来两台设备之间心跳检测、配置同步等。而Fabric Link 用于session的同步。
set interfaces fab0 fabric-options member-interfaces ge-0/0/2
set interfaces fab1 fabric-options member-interfaces ge-9/0/2
2.3 HA完成,状态检查
root> show chassis cluster interface
root> show chassis cluster status
注意:
HA一共用了两条线,一条control-link,一条fabric-link。
2.3.1 如果把control-link断开,这个时候HA就断开了,但是主防火墙还是正常工作control-link恢复,HA状态还是异常的。这个时候只有把备墙手动的重启,HA才会恢复。
2.3.2 如果把fabric-link断开,这个时候HA没有断开,但是主防火墙还是正常工作,备墙无法同步session,无法切换。若把fabric-link恢复,HA状态还是异常的。这个时候只有把备墙手动的重启,HA才会恢复。
2.4 识别HA线路的问题而做相应的操作
set chassis cluster control-link-recoveryfabric-link断开再恢复,HA状态会自动恢复,session会继续同步。
control-link断开再恢复,备墙会自动重启,完成HA。
2.5 为每个节点设置backup-router默认路由
user@host# set groups node0 system backup-router <backup next-hop from fxp0> destination <management network/mask>
user@host# set groups node1 system backup-router <backup next-hop from fxp0> destination <management network/mask>
2.6 设置apply-group命令,以便前面的命令设置的每个节点的单独配置仅应用于该节点
user@host# set apply-groups "${node}"2.7 RG0 固定用于控制引擎切换,RG1 主要用于数据引擎的切换。reth-count 指定整个Cluster 中redundant ethernet interface 最多数量。其中priority高值优先 。
set chassis cluster reth-count 10
set chassis cluster redundancy-group 0 node 0 priority 200 高值优先
set chassis cluster redundancy-group 0 node 1 priority 100
set chassis cluster redundancy-group 1 node 0 priority 200 高值优先
set chassis cluster redundancy-group 1 node 1 priority 100
2.8 把物理接口加入到冗余接口reth,并把接口reth0、reth1加入到数据冗余redundancy-group 1
set interfaces ge-0/0/3 gigether-options redundant-parent reth0
set interfaces ge-0/0/4 gigether-options redundant-parent reth1
set interfaces ge-9/0/3 gigether-options redundant-parent reth0
set interfaces ge-9/0/4 gigether-options redundant-parent reth1
set interfaces reth0 redundant-ether-options redundancy-group 1
set interfaces reth1 redundant-ether-options redundancy-group 1
2.9 这里需要注意的一点是,junos已经是将两台设备虚成一台,它只需要一个IP地址,而不是2个实地址一个虚地址。
set interfaces reth0 unit 0 family inet address <ip address/mask>
set interfaces reth1 unit 0 family inet address <ip address/mask>
2.10 配置 Interface Monitoring,被监控的接口Down 掉后,RG1 将自动进行主备切换
set chassis cluster redundancy-group 1 interface-monitor ge-0/0/3
set chassis cluster redundancy-group 1 interface-monitor ge-9/0/3
set chassis cluster redundancy-group 1 interface-monitor ge-0/0/4
set chassis cluster redundancy-group 1 interface-monitor ge-9/0/4
三、放行区域流量
有几点需要注意, 第一点创建了两个区域Trust 和Untrust ,区分大小写。第二点将reth1.0 划分到Unstrust 区域,将reth0.0 划分到Trust 区域。第三点,默认情况下防火墙的端口都是不允许访问的,需要放开相应的流量。上面配置表明, Untrust区域放开了https 、ssh 、telnet 访问reth1.0 该端口的流量, Trust 放开了访问reth0.0的所有流量(默认情况下,防火墙可以ping通直连,对端直连ping不通防火墙)。
set security zones security-zone Untrust interfaces reth1.0 host-inbound-traffic system-services https

set security zones security-zone Untrust interfaces reth1.0 host-inbound-traffic system-services ssh

set security zones security-zone Untrust interfaces reth1.0 host-inbound-traffic system-services telnet

set security zones security-zone Untrust interfaces reth1.0 host-inbound-traffic system-services ping

set security zones security-zone Trust interfaces reth0.0 host-inbound-traffic system-services all
四、创建策略及应用
4.1 创建2 个地址webpc-1 和webpc-2,并将其添加到地址集webpc-group 中。注意,名字是可以随意变更的。创建地址和地址集的目的只是给大家一个范例而已, 到时候策略进行调用的时候,可以单独调用地址,也可以调用地址集(必须建立地址簿)。创建的时候,请注意其对应的区域,是Trust 还是Untrust 区域。
set security zones security-zone Untrust address-book address webpc-1 X.X.X.X/32

set security zones security-zone Untrust address-book address webpc-2 X.X.X.X/32

set security zones security-zone Untrust address-book address-set webpc-group address webpc-1

set security zones security-zone Untrust address-book address-set webpc-group address webpc-2
4.2 创建端口,并添加到端口集2port ,注意,junos 自己集成很多相应的端口, 如ping ,telnet ,ssh 等
set applications application port-1010 protocol tcp
set applications application port-1010 destination-port 1010
set applications application port-2100 protocol tcp
set applications application port-2100 destination-port 2100
set applications application-set 2port application port-1010
set applications application-set 2port application port-2100
set applications application-set 2port application junos-telnet
4.3 调用相应的策略,对于满足要求的流量的进一步操作是放行(默认情况下是全部阻挡)。
set security policies from-zone Trust to-zone Untrust policy 001 match source-address apppc-group

set security policies from-zone Trust to-zone Untrust policy 001 match destination-address webpc-group

set security policies from-zone Trust to-zone Untrust policy 001 match application 2port

set security policies from-zone Trust to-zone Untrust policy 001 then permit
4.4 对从Trust到Untrust,还有Untrust到Trust区域的流量全部放行。
set security policies from-zone Trust to-zone Untrust policy Trust-to-Untrust-1 match source-address any

set security policies from-zone Trust to-zone Untrust policy Trust-to-Untrust-1 match destination-address any

set security policies from-zone Trust to-zone Untrust policy Trust-to-Untrust-1 match application any

set security policies from-zone Trust to-zone Untrust policy Trust-to-Untrust-1 then permit

set security policies from-zone Untrust to-zone Trust policy Untrust-to-Trust-1 match source-address any

set security policies from-zone Untrust to-zone Trust policy Untrust-to-Trust-1 match destination-address any

set security policies from-zone Untrust to-zone Trust policy Untrust-to-Trust-1 match application any

set security policies from-zone Untrust to-zone Trust policy Untrust-to-Trust-1 then permit
五、系统管理配置
5.1 设置时区
set system time-zone Asia/Shanghai5.2 创建用户admin,密码cisco123 并给予超级用户的权限
set system login user admin class super-user
set system login user admin authentication encrypted-password cisco123
5.3 开启SSH、telnet、Web 管理HTTPS服务
set system services ssh protocol-version v2  //开启SSH服务
set system services telnet  //开启telnet服务
set system services web-management https system-generated-certificate  //Web 管理HTTPS 服务
5.4 设置root认证密码
root# set system root-authentication plain-text-password
root# new password : cisco123
root# retype new password: cisco123
注意: 强烈建议不要使用其它加密选项来加密root 和其它user 口令( 如encrypted-password 加密方式) ,此配置参数要求输入的口令应是经加密算法加密后的字符串,采用这种加密方式手工输入时存在密码无法通过验证风险。另外请一定要配置root 用户口令,否则无法提交配置。
5.5 设备关机
SRX 因为主控板上有大容量存储,为防止强行断电关机造成硬件故障,要求设备关机必须按照下面的步骤进行操作:
- 管理终端连接SRX console 口。
- 使用具有足够权限的用户名和密码登陆CLI 命令行界面。
- 在提示符下输入下面的命令:user@host> request system halt ... The operating system has halted. Please press any key to reboot ( 除非需要重启设备,此时不要敲任何键,否则设备将进行重启)
- 等待console 输出上面提示信息后,确认操作系统已停止运行,移除电源线。
5.6 设备重启
重SRX 重启必须按照下面的步骤进行操作:
- 管理终端连接SRX console 口。
- 使用具有足够权限的用户名和密码登陆CLI 命令行界面。
- 在提示符下输入下面的命令:user@host> request system reboot
- 等待console 设备的输出,操作系统已经重新启动。
还有一项需要注意的是,有且只有你在配置完所有的东西以后并敲上commit
六、忘记root密码
SRX Root密码丢失,并且没有其他的超级用户权限,那么就需要执行密码恢复,该操作需要中断设备正常运行,但不会丢失配置信息。要进行密码恢复,请按照下面操作进行:
- Console口连接SRX,然后重启SRX。
- 在启动过程中,console上出现下面的提示的时候,按空格键中断正常启动方式,然后再进入单用户状态,并输入:boot -s
Loading /boot/defaults/loader.conf
/kernel data=… … syms=[… …]
Hit [Enter] to boot immediately, or space bar for command prompt.
loader>
loader> boot -s
注意:千万不要在开启的时候一直按空格,否则你会一直在等待中。3. 执行密码恢复:在以下提示文字后输入recovery,设备将自动进行重启
Enter full pathname of shell or 'recovery' for root password recovery or RETURN for /bin/sh: recovery- 进入配置模式,删除root密码,并重现设置root密码:
user@host> configure
Entering configuration mode
user@host#delete system root-authentication
user@host#set system root-authentication plain-text-password
user@host#New password:
user@host#Retype new password:
user@host# commit
commit complete